Making it through a website migration unscathed can be a bit of a minefield if you are not meticulous in your approach. Make sure you don’t miss anything important with the help of our comprehensive guide.
Carrying out a successful migration isn’t the easiest job in the world, but with proper planning many of the risks can be mitigated.
We’ve put together the following website migration checklist to help you navigate your way through the process, dodging many of the typical pitfalls and making it to the other side with a site that’s clean and tidy, and poised for SEO success.
What is a website migration?
When we say “website migration” we usually mean that a site has undergone a major change in one or more of the following aspects: the technology on which the site is built; where the site is hosted; how the content within the site is structured.
Website migrations can significantly alter the way your site is perceived by search engines, and as a result have the potential to impact your organic traffic significantly. The greater the change, the more chance your site will be re-evaluated from scratch – potentially losing any legacy ranking benefits in the process.
It is therefore vital to have a solid plan that’s tailored to your specific needs and designed to make the process as smooth as possible, covering the activities which need to be carried out before, during, and after launch.
Types of website migration
There are many different types of website migration with some being more common than others. Let’s look at some examples and highlight any context-specific concerns.
Protocol migration (HTTP to HTTPS)
Example: http://www.example.com to https://www.example.com
One of the most common reasons for a website migration during the past couple of years is to change protocols from HTTP to HTTPS.
HTTPS has become a requirement by modern web browsers because serving your site over the secure socket layer provides a much better level of security and privacy for your users. As a result, serving a site over HTTPS instead of HTTP means visitors avoid being shown an off-putting ‘not secure’ warning when landing on your website. This increases user trust and engagement, resulting in reduced bounce rate and increased dwell time, which serves as a positive ranking factor for search engines. Ergo, HTTPS can lead to better rankings than HTTP.
However, there are some things to look out for.
The process of migrating from HTTP to HTTPS is for the most part completed through configuration of your hosting environment. This is often the remit of an IT-focused supplier or member of your team. Tasks typically include procuring and installing an SSL certificate and reconfiguring the preferred host within a control panel such as Plesk or cPanel.
But there are also tasks which are more likely to be completed by a webmaster or website designer. For instance, updating all your site’s internal links to ensure they point to HTTPS URLs and ensuring assets such as images, CSS and JS files are referenced via https requests. If your site uses an off the shelf CMS such as WordPress, there will likely be CMS configuration variables that need to be updated with the new protocol, and various places in the database where the HTTP is referenced.
These items can seriously impact your SEO if not carried out as an integral part of the migration.
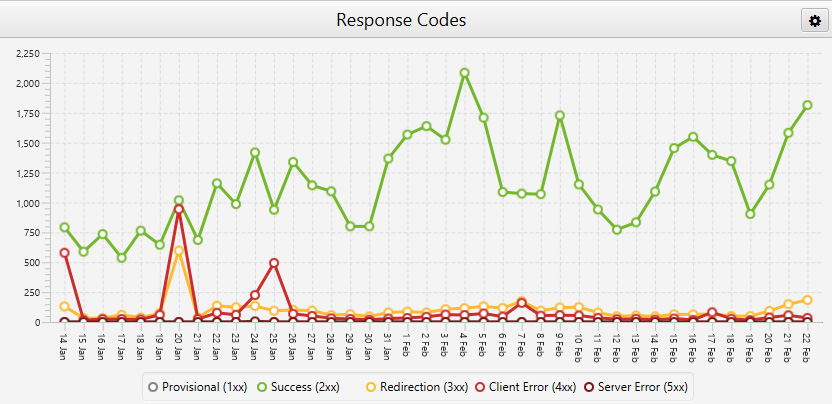
Once such checks have been completed, a critical step is to ensure that all HTTP URLs return a 301 redirect to their HTTPS equivalent. A site crawler such as Screaming Frog can help you crawl the entire site quickly and with minimal manual work, after which you can use the ‘response codes’ or ‘redirect chains’ reports to verify.

Domain migration
Example: https://www.example.com to https://www.newexample.com
A domain migration involves changing the domain name by which a site is addressed. This is usually the case when a business rebrands or acquires a domain name that’s a better match for their existing brand.
When migrating to a domain which has previously been owned by another person or business, this type of migration carries with it some of the highest risks in terms of unforeseen organic impact.
Before you even purchase a ‘used’ domain, you need to check its history.
If the domain has been used by another site for a sustained period of time, it is likely to have accumulated a variety of external signals which search engines use to decide who the site is going to be useful to.
If the purpose of the previous site was not the same as that of your own, serious work might be needed to change how the domain is perceived by search engines.
This work might involve cleaning up and disavowing links which were once valuable to the previous owner but won’t be for you because they aren’t relevant to what your business does. Strong links and domain mentions which seem like they might help your site to rank will only be of value if they are context-relevant to your vertical.
A further risk is where a domain has not been in use for a sustained period – perhaps displaying only a holding page, or a “for sale” message. Google and other search engines often suppress such domains from the public index because they offer little value to end users, and it can take a long time for them to be ‘allowed’ back into the public index again.
In one case we saw last year, this process took nearly 12 months from migration.
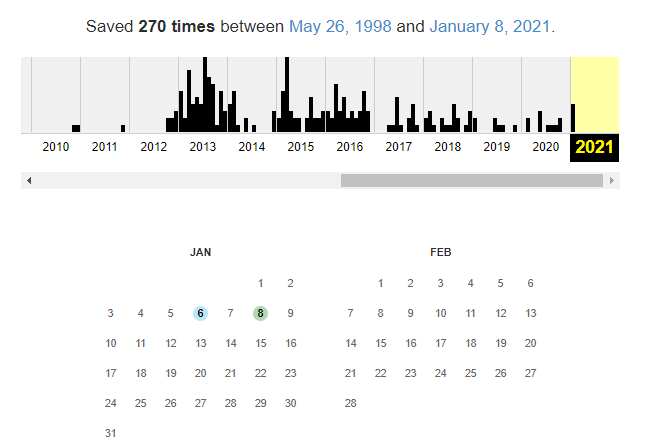
So, it is crucial to run some checks on what a domain was used for previously as this could be key to the success of your website for the short-medium term. Internet Archive is a great tool for providing a visual on site iterations over the years. SEO tools such as Sistrix, Ahrefs, SEMrush, Majestic are great for checking backlinks, visibility, and which keywords that domain has featured in the SERPs for previously. This can all help to build a picture of how a domain is perceived.
For example, let’s say your website sells cars, but after completing some of the above checks you discover that your newly acquired domain name was previously used by a site that sells watches. If all the external backlinks relate to wristwatches, it is highly likely that search engines will continue to associate that domain name with watches until the weighting of the backlink profile shifts to something more relevant. In the meantime, you’ll need to rely on other channels to make up for the shortfall in your organic performance.
It also means that historic backlinks which have a high perceived value to your seller and were therefore factored into the price demanded for the domain, might actually be a major liability rather than an asset.
Is it perhaps worth revisiting your choice of domain?
Domain extension migration
Example: https://www.example.co.uk to https://www.example.com
A domain extension migration is when a website might switch from a ccTLD (country code top-level domain) to a gTLD (generic top-level domain) or the other way around. This is often the case where a business is looking to shift to a more internationally-focused business model.
Where the target domain is newly acquired, it is worth doing the same checks mentioned in the ‘domain migration’ section above, as another business could have been using the .com version of your domain for a purpose completely different to your own.
International targeting is a topic of its own, but with regards to a migration there are a couple of key points to consider:
- Configuration of hreflang tags. Is the intention to use your new domain to target different language audiences? If so, international SEO will have to be considered. You will need to set up a URL structure which allows crawlers to understand how to access different language variants of the same content, which will involve the use of hreflang tags.
- International targeting settings within Search Console. Where a domain has a non-country specific extension, Search Console allows webmasters to set a preferred target country. You will need to check that this setting matches your needs. (This is now a legacy tool in Search Console).
Subdomain migration
Example: https://blog.example.com to https://www.example.com/blog
Sub domain migrations can be carried out for a variety of reasons, such as migrating a blog to your main website or merging separate mobile and desktop sites into one responsive site.
Site merger
Example: https://www.example1.com and https://www.example2.com to https://www.example3.com
Site merges involving pre-existing sites on multiple domains can be very complicated. You could be looking to merge multiple businesses together under a new domain or consolidating multiple international sites in to a TLD with sub folder structures.
Change of URL structure
Example: https://www.example.com/some-path/product-url to https://www.example.com/product-url
Structural changes to URLs or content can take place as an additional factor in many of the above migration types. You could be changing platform from Shopify to WordPress or moving blog content from the root to a subfolder. Making sure redirects are setup correctly will help transfer equity over to the new URLs.
Website migration process
Regardless of the type of website migration being carried out, the process can generally be split into three stages: pre-launch, launch day checks, and post-launch.
Pre-launch
Domain name checks
As mentioned previously, if purchasing a domain to migrate your website to, do some background checks to establish what the history of the domain is. Look out for anything that stands out as a potential issue – such as unrelated backlinks, highly niche historical keyword rankings, or manual penalties.
Performance checks
Deciding which content to keep should be a key consideration in any site migration.
Do you plan to hold on to all your content? If not, consider whether it would it be easier to migrate the website in its entirety and perform a content cull at a later date, or to grasp the nettle and whittle it down beforehand.
Performing a detailed check on which pages have value, and then cutting them down pre-migration could result in a quicker and cleaner migration because search engines will not have as many URLs to crawl during the migration itself.
By using Google Search Console to assess keyword rankings and preferred URLs, and Google Analytics to assess site performance across all channels, you can identify those pages which have insufficient commercial value and can be safely pruned.
Once this has been completed, before proceeding with your migration allow time for search engines to recrawl your site, notice the changes and reduce the number of requests to those URLs.
Log file analysis
Log file analysis is a relatively technical SEO activity, with a learning curve which is too steep for some, but it can give you a deep understanding of what search engines are up to when they visit your website. This is hugely insightful when it comes to site migrations because you can measure crawler behaviour before, during and after, giving you a clear view on migration success.
Server log files are crammed with information on which of your site’s pages and assets search engines and bots love to crawl. This can help with fixing internal linking issues and crawl errors; identifying legacy URLs which are still being crawled but not reported; and helping with redirect mapping and testing throughout the process.
You could use Screaming Frogs log file analyser to simplify the process.
Fixing non-200 internal links
Fixing internal links that don’t return a 200 response in the pre-launch phase can help to conserve crawl budget, and also save you time by improving the signal to noise ratio in your post-launch logs.
A tidy crawl profile makes it much easier for crawlers to understand your site, and that can expedite your migration success because there are fewer URLs to be recrawled and re-evaluated.
If doing this manually, remember to check desktop and mobile navigation menus, legacy content such as old blog posts, references to assets such as images, and technical items which are hidden from view such as canonical tags and XML sitemaps.
Log file analysis can help you spot broken requests; crawler software such as Screaming Frog can help you identify broken links within your site content and can help to identify misconfiguration of technical items in bulk.

Take advantage of link building services to monitor the quality of your internal – and external – links.
URL gathering
Gathering a comprehensive list of all known URLs is an essential pre-launch activity. This list can be used as your master record for testing redirects post-launch.
But how can you gather all such URLs? You should use multiple sources to make sure you’re getting a complete picture. Here are some suggestions:
- Google Search Console (gather top performing pages, top pages being linked to).
- Google Analytics (gather all landing page URLs from all channels during the past 12 months).
- Landing page URLs in paid search accounts such as Google Ads & Bing Ads.
- External sources such as Sistrix, Ahrefs, SEMrush, Moz and Majestic are a good source of URLs which are referenced externally – particularly valuable legacy backlinks.
- A full website crawl using Screaming Frog.
- Server log files will shine a light on any URLs search engines are crawling, but which aren’t featured elsewhere.
- Redirect instructions, for instance in your site .htaccess file, routes file or IIS configuration.
Once you’ve gathered the URLs from all these places, you will need to de-duplicate, and then categorise into those you want to keep and migrate, and those you want to remove.
Robots.txt
The robots.txt file affects the way in which search engine spiders crawl your site. Your current website should have one, but you should also consider the one on your staging/development website.
With the current website, it’s a good idea to check whether the directives within are still necessary.
For your new staging site, it’s crucial to ensure that search engines cannot crawl it before go-live.
XML sitemaps
Your XML sitemaps should provide a comprehensive list of the content you want indexing. They can help crawlers to discover your new URLs and help keep track of indexing coverage – of both your new and old URLs.
This can be accomplished by splitting the sitemap into categories of URL based on a common theme. For example, a particular type of content such as blog posts might be listed in one XML sitemap whilst product URLs are itemised in another.
By hosting an XML sitemap of your legacy URLs on your new website, you can expedite the crawling of the old URLs and monitor how many remain in the index over time. This can help you spot legacy content which continues to rank long after a migration has taken place and might provide clues as to how to resolve the issue.
hreflang configuration
If you are migrating multiple domains to a new TLD domain with multiple target languages, it is vital you make sure the hreflang configuration is done on the staging site and tested before launch. This can include checking the hreflang is implemented in the code of each page or the XML sitemaps, whether the html lang tag has been set, or even that the content has been translated correctly.
You should check for hreflang tag coverage, canonical configuration of each page variant, inclusion of reciprocal tags between page alternates, and whether all the required language/locale pairings are present and correct.
Search Console checks and new setup
Before launch you should ensure you have access to all the Google Search Console properties that you need to complete the migration.
Separate properties are usually required to monitor performance of http://, https://, http://www. and https://www. variants of a domain.
A “Domain Property” will cover all variants of your domain, including subdomains, but only by claiming the individual properties will you have access to all the settings and reporting tools for each.

If your migration involves a change of domain, then you will need to do this for both the current domain and the new domain.
Once you have access to all the required Search Console properties, you should check through the various sections for any major problems such as security issues and manual actions. You should also check the coverage tab for any issues Google has in crawling the current website.
It’s also worth claiming your site’s Bing Webmaster Tools profile and working through the checks in there too. This is Microsoft’s equivalent of Google Webmaster Tools and offers a different perspective on essentially the same information.
Taking time to address these issues now will help secure a better outcome once the migration takes place.
Google Analytics setup
By default, Google Analytics is domain and protocol agnostic. If you install the same Analytics snippet on different sites then the data from both will be recorded.
However, it is important to check your GA configuration for any domain specific configuration – for instance, whether tracking is restricted only to a specific domain or domain property. This is sometimes done to prevent erroneous data recording from staging sites, for instance.
Depending on your circumstances it might be worthwhile setting up a separate profile for the new domain or site so that you can compare performance before and after the migration. This can be a useful diagnostic if things don’t go to plan.
Other marketing channels
We won’t go into detail on this point, but considering the potential impact of the migration on other marketing channels is an important part of a website migration. As part of your pre-launch checks, create a list of any elements from your wider marketing activities that might need updating. These could include:
- Landing pages used in your PPC and display advertising accounts
- Links in social media profiles and popular/prominent posts
- Business directory listings such as Google My Business, Bing Places for Business and other directories
- Email marketing landing URLs
- Product URLs included in feeds for affiliate marketing and similar channels
- Traditional advertising such as print media, radio and television
For larger sites and businesses with complex teams, it is important to have a conversation early on with marketing suppliers and similar stakeholders to make them aware of the migration, and to ask what concerns they have about potential impact.
Redirect mapping
Redirect mapping is arguably the most important part of the pre-launch phase. We usually leave this step until as late as possible in the pre-migration preparations due to the potential for other activities (such as pruning and restructuring) to impact the list of old and new URLs.
This saves time being wasted on maintaining and updating redirect instructions to accommodate other changes which occur after the mapping has taken place.
A key consideration when planning redirects is that unless your migration is a straightforward “copy and paste” of a site from one domain to another with no structural changes, it is usually not possible to take a “one size fits all” approach to redirect instructions.
Here are some different redirect types to consider:
- Page to page redirects (https://www.example.com/category/page/ to https://www.example1.com/category/page/). If you want to retain as much ranking equity as possible, the majority of your redirect mapping should be page to page. For best results, the content on your new page will need to be at least as good as that on your existing page.
- Page to parent redirects (https://www.example.com/category/page/ to https://www.example1.com/category/). This type might be necessary if during the pre-launch phase you decide to prune some lower level content where no suitable equivalent is available, but a closely related parent page or container category does exist.
- Page to root redirects (https://www.example.com/category/page/ to https://www.example1.com/). This might be the best option if there are some pages on the current site that have no direct or parent page to redirect to. Redirecting the URL back to the root (homepage) is only worthwhile if it doesn’t create too great of a disconnect for an unsuspecting user and result in a bounce.
- No redirect. Allowing a URL to 404 might be the best solution if there is truly no equivalent and your new site is of no value to users searching for your old content. For instance, if you have decided to no longer sell an entire category of product.
Don’t forget your pre-existing redirects too, making sure these do not get overlooked or conflict with the new redirect mapping. Even if there are redirects which have been in place for a long time (upwards of 12 months), it is likely that some still get crawled from time to time – log file analysis can help you to verify whether or not this is the case.
Another important point to consider is that redirects should always take the shortest, most direct path possible. Rather than sending users from A to B to C, requiring 2 redirect instructions, you would ideally want them to go from A to C, requiring a single instruction. The ‘redirect chains’ report in Screaming Frog can be used to check your redirect rules for any entries which result in multiple steps.
Launch day checks
Launch day has finally arrived! Your staging site is complete, your redirects are ready to go, you have set up all your tracking in preparation. With no further ado, you push live.
Here is a list of things you should check immediately:
- Make sure your redirects are working. We like to run a few manual spot checks straight away, followed by a full crawl of all the old URLs in the redirect mapping list to make sure they lead to a sensible endpoint. A crawler such as Screaming Frog can be used in ‘list mode’ to automate this.
- Check the robots.txt file. If you had a disallow directive in place on your staging environment, you need to make sure this has been removed now the site is live. You should also double check the directives in there to make sure you’re happy with them. Google offers a robots.txt tester to help see if the directives within work as expected.
- Check your XML sitemaps. Make sure all the URLs you would like indexing are included. This is going to help Search Engines discover and index your new URLs faster. Submitting the XML sitemaps to places like Google Search Console will also help identify any issues. And finally – don’t forget to include a sitemap directive in your robots.txt file!
- Ensure your XML sitemaps are set up in Bing Webmaster Tools.
- Run a full crawl. It is worth running a full crawl to make sure all internal links return a 200 status; all canonical URLs have canonical tags that match the request URL; that indexing directives are not blocking key pages or if you have missed a certain section that should not be indexed; that hreflang and lang tags are set up.
- Check that your tracking tools such as Google Analytics are working on the new domain. The real-time reporting feature can help you see what’s going on with real users.
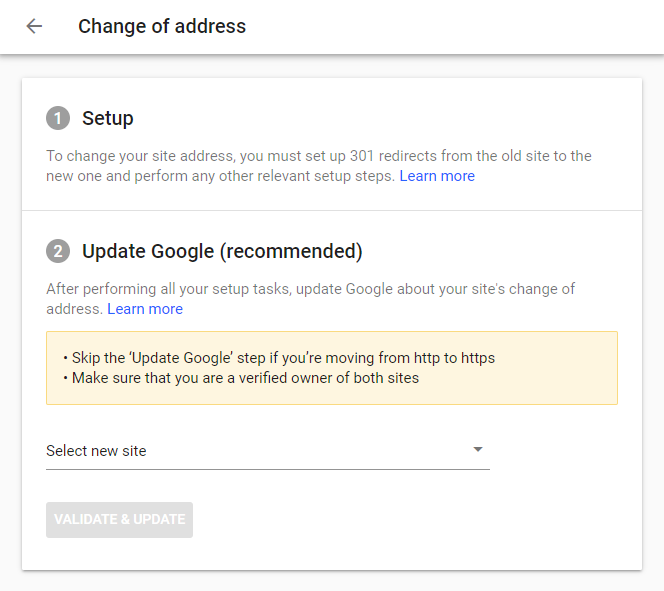
- If your initial checks look good, remember to tell Google you have moved domain. One of the most important things to do on launch day is using Google’s change of address tool to notify them that your old domain has been migrated to the new one. This will help Google verify the change and hopefully speed up the process of crawling and indexing the new domain.
- Update target URLs on your paid advertising channels. For a lot of businesses, PPC and paid social channels are critical revenue drivers, so don’t forget to update all your ad creatives with the new landing page addresses. Shopping feeds will also need to be checked to ensure your product URLs are still valid. Pay particular attention to multi-variation products, which may include additional URL parameters for helping crawlers to access individual colour/size variants. This becomes even more complex where hreflang parameters are also in use.
- If your migration involves a change of domain (and company/brand name), remember to check for mentions of the old brand name, company name or domain name. Places which are often overlooked include page meta titles, meta descriptions, structured data, image filenames and alt text, and site-generated emails (e.g. order confirmation emails). Also remember to check external links to your other web properties. For instance, social profiles, Google My Business listing, and external review sites.
Post-launch checks
Post-launch checks should be carried out regularly over the days and weeks following launch. You should keep an eye on the areas covered during the pre-launch phase to make sure there are no emergent issues. Here are three key activities which could help spot any issues and help to secure a good migration outcome:
- Checking through all areas of Search Console. Search Console will take a few days to start reporting meaningful data, but once it does you should aim to fix any issues that are highlighted as quickly as possible. The main areas of focus are:
- Coverage issues to fix any crawl errors or areas Google can’t index
- Mobile friendly section in case there are issues with the new site or domain which mean Google can’t render pages correctly
- Core Web Vitals for issues relating to speed and user experience
- The structured data section for problems such as incomplete product schema
- The crawl stats section to check if the new site is being crawled and if so whether or not this is at a comparable rate to the previous site.
- Checking server log files. This is effectively the ‘other side’ of the crawl stats section from Search Console – seeing what search engine crawlers get up to when they visit your site, but with a greater level of transparency and detail, which will help you to resolve any issues.
- Start reclaiming backlinks. Get in touch with the sites hosting your most important backlinks to request that they are updated to point to your new URLs. This task could take some time, but it could still be easier to reclaim an existing high profile backlink than to try and place a new one. Tools like Ahrefs can help identify which backlinks are most worthwhile.
Keeping an eye on performance across two different domain properties can be messy, with Google not allowing you to compare domains, however, Custard have created a free migration monitoring tool in Google Data Studio to make this process simple.
Website migration tools
Here’s a list of tools that could help with your website migration:
- Google Search Console & Analytics – for tracking internally
- Moz, SEMrush, Sistrix, Ahrefs, Majestic – for external checks of the old and new domains
- Internet Archive – for checking history of new domains
- Screaming Frog – for all your crawling and checking needs
- Screaming Frog Log File Analyser – for simplifying the process of checking your log files pre/post migration
Planning a website migration?
Each website migration is unique. The migration projects we work on typically involve multiple migration types taking place simultaneously. In those cases, we sometimes recommend that our client performs certain elements of the migration (such as a site restructure) in isolation before the full migration takes place. This may create more work in the short term, but it can de-risk the migration itself.
It doesn’t really matter what type of migration you’re dealing with – following an ordered process like the one we’ve set out above will help you to have a successful outcome.
If you need further information or are considering a website migration project of your own and would like some help, our Technical SEO team would love to hear from you.